
RakAPIt MCP Server
Introduction
The RakAPIt MCP server is a bridge that enables seamless control of the entire API testing workflow using RakAPIt through AI assistants (such as Claude Desktop). Without opening a browser and performing manual clicks, you can build, execute, and manage tests using natural language directly from your regular chat interface.
Main features:
- Simple test case creation
By simply providing API specifications or requirements, you can instantly generate executable test cases that run on RakAPIt. - Test execution from chat
Specify particular test cases or groups for immediate execution. Execution status and pass/fail results can also be monitored in real time directly within the chat. - Smart group management
Test cases can be grouped by purpose (e.g., regression testing, smoke testing, login-related), allowing organized and centralized management.
Prerequisites
To use the RakAPIt MCP server, the following preparations are required.
- Obtain a RakAPIt API key
This is required for the server to operate RakAPIt on your behalf. Please follow the steps below to obtain it.- Log in to RakAPIt.
- Click the icon in the upper-right corner of the screen, then select 「My Profile」from the dropdown menu.
- On the profile details page, click the「Generate Token」button.
- Copy the issued token and store it securely in a safe location.
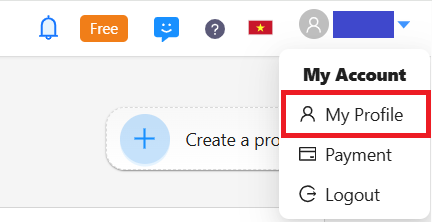
My Profile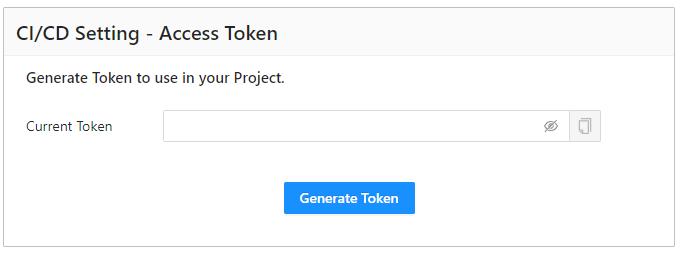
Generate Access Token - Prepare an MCP-compatible client
This server has been verified to operate with major MCP-compatible AI agents.- Claude Desktop/ Claude Code: The most standard MCP client
- GitHub Copilot: Available through extensions such as those for VS Code
- Cursor: An AI code editor that natively supports MCP
Setup Steps
-
Configuration in Claude Desktop
Claude Desktop is the reference implementation of MCP and operates most stably.
- Open the configuration file (
claude_desktop_config.json) in an editor.
macOS:~/Library/Application Support/Claude/claude_desktop_config.json
Windows:%APPDATA%\Claude\claude_desktop_config.json -
Add the following configuration to the
mcpServerssection.
JSON{ "mcpServers": { "RakAPIt": { "command": "npx", "args": [ "mcp-remote", "https://rakapit-mcp.dockyard.biz/mcp/", "--header", "Authorization: ${API_KEY}" ], "env": { "API_KEY": "Your API key" } } } }
- Open the configuration file (
-
Configuration in Claude Code
Claude Desktop is a GUI-based application, but Claude Code is a CLI tool that runs in the terminal. Therefore, you can use different settings depending on the scope: "per project" or "global".
- Create/edit the configuration file
Depending on the scope you want to configure, prepare the configuration file in one of the following locations.- Configure per project (local):
Create.mcp.jsonin the working directory (project root). The MCP server will only be active when that project is open. - Configure for all projects (global):
Create or edit the configuration file in the following paths.
~/.claude.jsonor~/.config/claude/config.json(depending on environment)
Windows:%USERPROFILE%\.claude.jsonNote: You can also check and modify settings using the
claude configcommand. - Configure per project (local):
-
Add the following configuration to the
mcpServerssection.
JSON{ "mcpServers": { "RakAPIt": { "command": "npx", "args": [ "mcp-remote", "https://rakapit-mcp.dockyard.biz/mcp/", "--header", "Authorization: ${API_KEY}" ], "env": { "API_KEY": "Your API key" } } } }
- Create/edit the configuration file
-
Configuration in GitHub Copilot (VS Code)
The MCP server can also be used in the VS Code Copilot Chat extension.
- Open VS Code and launch the Command Palette (
Ctrl+Shift+P/Cmd+Shift+P). - Select 「MCP: Open User Configuration」 to open the configuration file.
-
Add the following configuration to the
mcpServers(orservers) section.
JSON{ "servers": { "RakAPIt": { "type": "sse", "url": "https://rakapit-mcp.dockyard.biz/mcp/", "headers": { "Authorization": "Your API key" } } } } - Open VS Code and launch the Command Palette (
-
Configuration in Cursor
In the AI editor Cursor, configuration can be performed intuitively via the GUI.
- Open Settings from the gear icon in the upper-right corner of Cursor.
- Navigate to the Features > MCP section.
- Click 「+ Add New MCP Server」 and enter the information below.
- Add the following configuration to the mcp section.
JSON{ "servers": { "RakAPIt": { "type": "sse", "url": "https://rakapit-mcp.dockyard.biz/mcp/", "headers": { "Authorization": "Your API key" } } } }
Available Tools
This is the list of 「Tools」 provided by the server. Users can refer to this to understand what they can request the AI to perform.
| Tool Name | Description | Example |
|---|---|---|
| addValuePatternsBodyParams | Adding test data to existing body parameters | 「Add some test data for the parameters: body_type and year」 |
| addValuePatternsUrlParams | Adding test data to existing url parameters | 「Add some test data for the parameters: name and maker」 |
| addValuePatternsHeaderParams | Adding test data to existing header parameters | 「Add some test data for the parameters: accept」 |
| createProject | Create a project with or without importing a Swagger / OpenAPI file | 「Create a new project」 |
| createTestObject | Create a test object | 「Create a new test object」 |
| generateTestCases | Automatically generate test cases in bulk | 「Automatically generate test cases」 |
| createTestCases | Create test cases based on user descriptions | 「Create test cases with valid values for the 'name' field」 |
| runTestCases | Execute test cases | 「Run the test cases」 |
| createTestSuite | Create a test suite | 「Create a test suite」 |
| addTestcasesToSuites | Add test cases to a test suite | 「Add test cases to the test suite」 |
| createBatch | Create a batch | 「Create a batch」 |
| runBatch | Execute a batch | 「Run the batch」 |
Use Cases
By simply talking to the AI assistant, you can complete the entire API testing lifecycle.
Tips: Tips for reliably invoking RakAPIt MCP
Add the phrase「Using RakAPIt」to the beginning of your prompt on the first interaction. This will help the AI prioritize recognition of RakAPIt MCP tools and ensure more accurate test case generation and execution.
Example: 「Using RakAPIt, create the following project」
In subsequent interactions, the context is maintained, so the prefix「Using RakAPIt」is not necessary.
- Example prompt for creating a project: Create the following project
Name:Test Project
Swagger URL: https://rakapit-document-prod.s3-ap-northeast-1.amazonaws.com/swagger/cars_api_v3.json - Example prompt for creating a test object: Create a new test object
- Create test data
The AI automatically generates optimal test data based on the OpenAPI (Swagger) definition. It analyzes parameter specifications and instantly produces highly comprehensive data including boundary values and negative cases.- Example prompt: Add some test data for the parameters:
name
body_type
maker - Effect: Even when there are complex JSON structures or validation rules, valid test data can be generated immediately.
- Example prompt:
- Create test cases
Use RakAPIt's powerful auto-generation capability to instantly build tests.- Example prompt: Automatically generate test cases in the
Add Cartest object. - Effect: Eliminates the need to manually enter steps, allowing anyone to easily create test cases.
- Example prompt:
- Execute test cases
Run individual tests or tests under specific conditions on demand.- Example prompt: Run the test cases created earlier and summarize the results.
- Effect: Without opening the management UI in a browser, you can verify execution results and analyze error logs directly within the chat.
- Example prompt:
- Test case management
Organize the growing number of test cases logically with the help of AI.- Example prompt: Group the valid test cases together and create a test suite called 'Normal Cases'.
- Effect: Large volumes of testing assets can be organized by purpose or category, maintaining a manageable structure at all times.
- Example prompt:
- Batch execution (bulk execution)
Execute multiple tests together to quickly verify the overall health of the system.- Example prompt: Create a batch called 'Regression testing' and include the test suite created earlier.
Run the 'Regression testing' batch. - Effect: Final checks before release (such as smoke testing) can be reliably performed with a single instruction.
- Example prompt:
Security
RakAPIt places importance on security when providing the MCP Server so that users can utilize our service with confidence and peace of mind.
- Data Handling
Customer data will not be used for machine learning or AI model training purposes. The information and test data entered will be used only within the scope of service provision. - API Key Usage
API keys are used only for RakAPIt authentication and access control. They will not be shared with third-party services or used for any unintended purposes. - Security Initiatives
RakAPIt continuously undertakes service improvements and feature expansions. Throughout this process, we always consider security and strive to maintain safety and reliability.